


The release of bulk actions in the Google Tag Manager user interface was very welcome. For years, GTM users had been struggling with a somewhat crippled workflow of item-by-item management.
This release is even more impressive with the most recent update to it: bulk actions with TRIGGERS.
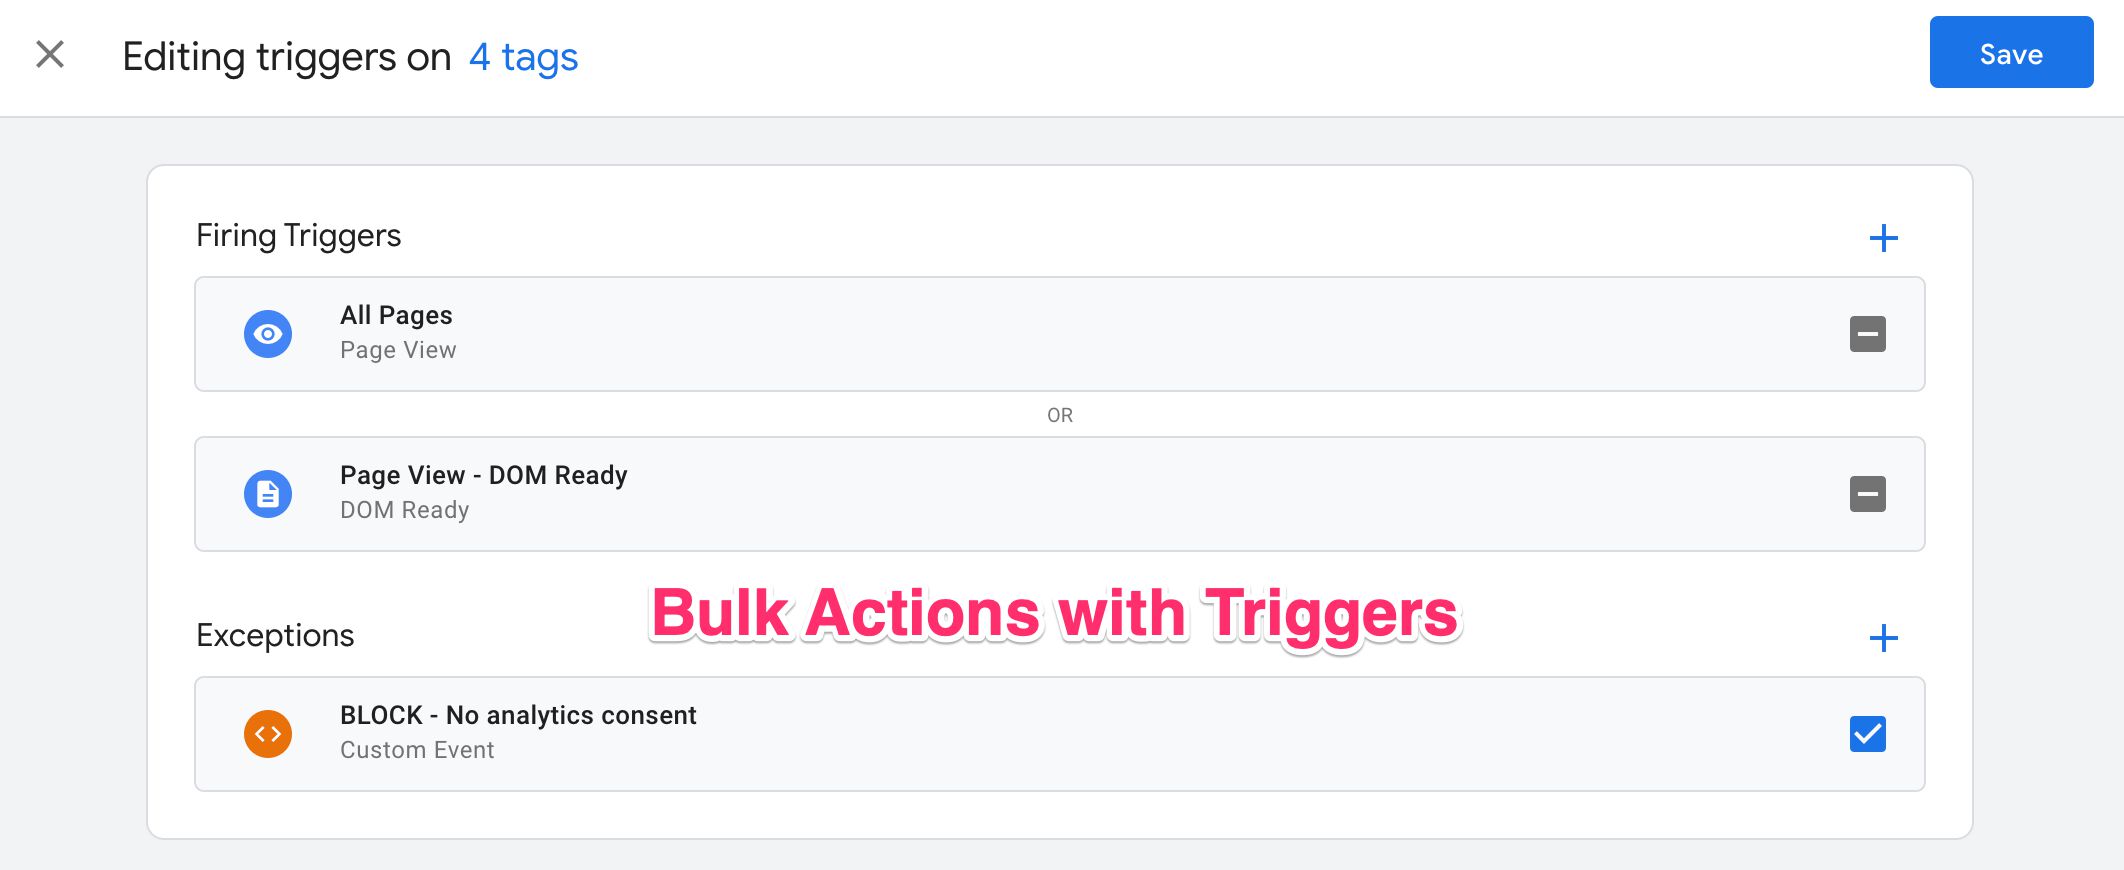
You can now select multiple tags and attach one or more triggers (or exceptions) to them. Or, conversely, you can use the feature to remove triggers (or exceptions) from tags.
This is very useful when you have 200 tags that require an intricate trigger and exception setup to accommodate a consent management platform, for example.
Be sure to check out the official documentation behind this link as well!
X
The Simmer Newsletter
Subscribe to the Simmer newsletter to get the latest news and content from Simo Ahava into your email inbox!
How it works
First, enter the Tags section of your Google Tag Manager. Check the box next to all the tags you want to select for updating triggers with and click the funky trigger icon in the table header.
An overlay opens. If your screen is wide enough, you’ll be able to see the items you selected, but there’s also a visual reminder of how many tags’ triggers you are about to edit.
In the overlay, you’ll see all the triggers and exceptions that exist in the selected tags. The icons at the end of each row reveal a lot about the state of the bulk action:
A dark grey box with a minus symbol means that the trigger or exception was found in one or more tags but not all of them. If you click the checkbox, it will turn into an empty box. If you click it then again, it will turn into the blue checkmark box.
A blue checkmark box means that the trigger or exception will be applied to all the selected tags. If the box already had a blue checkmark when the overlay first opened, it means that the trigger or exception was already attached to all the selected tags. Clicking the box will turn it into an empty box.
An empty box means that the trigger or exception will be removed from all the selected tags. This is the default setting for a trigger or exception that was added via the bulk action overlay. If you click an empty box, it will turn into a blue checkmark box.
In other words, when you click the checkboxes next to a trigger or exception, you will toggle between add to all selected tags or remove from all selected tags.
Selections in the overlay.
Result of saving selections.
When you are ready, click the Save button in the top right corner of the overlay.
Trigger selection and creation flows
In the bulk trigger action overlay, if you click the blue plus symbol in the corner of either the triggers list or the exceptions list, you’ll enter the familiar flow of trigger or exception selection.
You can even progress deeper down the rabbit hole by clicking a similar blue plus symbol in the trigger selection overlay to enter the trigger creation flow.
In other words, you can manipulate the entire trigger and exception setup for the selected tags – all the way from creating the necessary triggers and/or exceptions to adding them to the tags.
Summary
Having the ability to bulk edit triggers and exceptions will be a time-saver for many.
Managing an ever-growing container, especially one with heaps of technical debt, is easily deprioritized when the admin has to decide between refactoring and adding new stuff in.
With bulk actions, refactoring and improving the consistency of a container has become a lot easier to do. Combined with partial exports and a powerful RESTful API, your tools for managing complex multi-container setups are in pretty good shape.
There’s still a lot that can be added to bulk actions (roll changes back, rename items, edit individual fields…) – I hope we’ll keep on seeing nice, incremental updates like this in the future.
What do you think is still missing from bulk actions?


